The TYPE setting on a SpaNET controller is vital for pump configuration, heating & touchpad functionality. When the TYPE value is set incorrectly it will impact the function of your spa dramatically. Common symptoms are pump buttons functions have changed and are controlling different pumps/blower compared to normal, spa overheating, jet pump running at times other than during daily sanitise cycle.
The TYPE value must be set to match your Spa control model. Eg. If you have an SV2 controller the correct TYPE setting is SV2.
The touchpad you have fitted will determine how to navigate to the TYPE setting. See options below.
Changing the TYPE value on a SV2T touchpad
Changing the TYPE value on a SV3T touchpad
Changing the TYPE value on an SV Mini 1 or Mini 2 touchpad 1
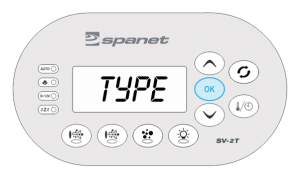
Changing the TYPE value on a SV2T touchpad
1. Press and hold PUMP B + BLOWER + W.CLN buttons to enter factory setup menu
2. Press UP button until display shows TYPE
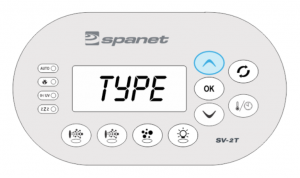
3. Press OK to enter the TYPE setting, display might show SM1
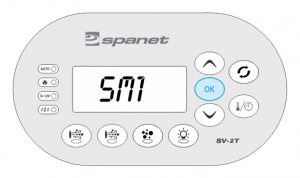
4. Use DOWN button to change from SM1 to SV2
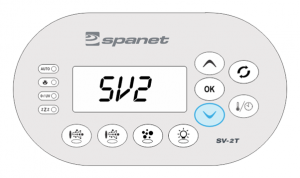
5. Press OK to confirm & save, display will return to TYPE
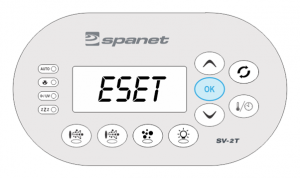
6. Press UP button until display shows BOOT

7. Press OK button to reboot spa control (display will briefly flash ESET and then spa will start priming cycle)
NOTE: Often the TYPE value has changed because of data corruption, it’s wise to check the element count (ELMT).
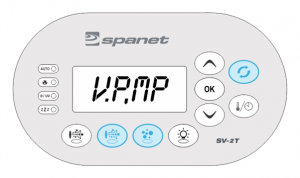
1. Press and hold PUMP B + BLOWER + W.CLN buttons to enter factory setup menu and now display will show V.PMP
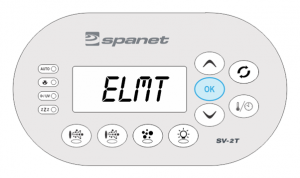
2. Press the UP button until display shows ELMT
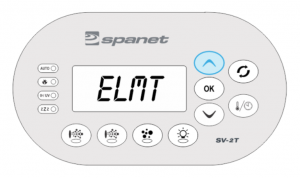
3. Press the OK button to enter ELMT setting, display will show 1
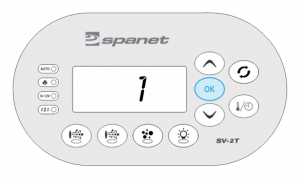
4. Press the UP button to change from 1 to 2
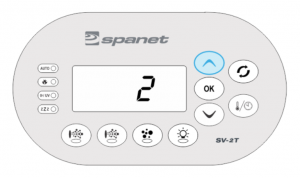
5. Press the OK button to confirm and save, display will return to ELMT
Changing the TYPE value on a SV3T touchpad
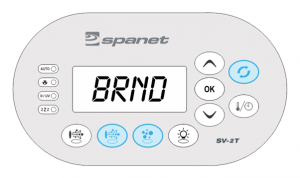
- Press and hold PUMP B + BLOWER + W.CLN buttons to enter factory setup menu (display will show BRND or V.PMP)
- Press UP button until display shows TYPE
- Press OK to enter TYPE setting, display will show SM1 (or something other than SV3)
- Use DOWN button to change setting back to SV3
- Press OK to confirm and save, display will return to TYPE
- Press UP button until display shows BOOT
- Press OK button to reboot spa control (display will briefly flash ESET and then spa will start priming cycle)
Changing the TYPE value on an SV Mini 1 or Mini 2 touchpad
- Access the OEM config menu by pressing & holding the 3 button as pictured below. The screen should then change to display either V.PMP or BRND. You can then release the buttons.
- Press the UP button until the screen displays TYPE, then press OK
- Use the UP or DOWN buttons to navigate to the correct model number. If you have an SV Mini 1 controller you must navigate to SM1. If you have an SV Mini 2 controller you must navigate to SM2.
- Press OK to confirm & save your selection. The screen will then display TYPE again.
- Now use the UP arrow button until the screen displays bOOT & press OK to reboot the system.
Changing the TYPE value on an SmartTouch touchpad
- Enter the settings menu
- Scroll to the very bottom & select Advanced menu
- You’ll then be prompted to enter a PIN code to continue. The PIN is 14863
- Once in the advanced menu, scroll all the way to the bottom & Factory options menu.
- You’ll then be prompted to enter a PIN code to continue. The PIN is 74269
- Select the Model type option
- Then use either the minus (-) or plus (+) button to navigate through the different setting options.
- When the correct setting has displayed press the save button.
- The screen will show ‘settings as saved’, then press the back arrow button in the top right corner.
- Now that you’re back in the factory option menu, scroll to the bottom of the list & select Reboot controller
- Select BOOT press to restart. Once completed, press the back arrow multiple times to navigate back to the home screen.
- Once the above steps are complete, reset mains power to finish the process (i.e. turn power OFF for 10 seconds, then power back ON)
Download your free guide